
SaC It Up: Dive Deep into DevSecOps with Java, Quarkus and Keycloak
SaC It Up: Dive Deep into DevSecOps with Java, Quarkus and Keycloak
In the ever advancing world of software industry, code and security often feel like antagonistic vectors. But what if security could move at the pace of code ? Enter Security as Code (SaC): the next phase of the DevSecOps evolution. By including security rules, expectations and policies directly into the development lifecycle, SaC shifts security left, turning traditionally manual and repetitive tasks into automated, version-controlled artifacts. This isn’t just a technical upgrade but a cultural change where developers, security teams, and operations speak the same language: code.
Whilst software delivery pipelines progressively become automated, making security an integral part of the code isn’t anymore a best practice, but a necessity. From this perspective, SaC is considered as being the natural progression of DevSecOps. Addressing security strategies, controls and policies as development artifacts which could be tested, audited and versioned, just like infrastructure and application code, not only scales better but also ensures security is enforced consistently across environments and teams.
In this article, we’ll explore how SaC allows DevOps and DevSecOps teams to build fast, to ensure appropriate security and to trustfully scale in modern cloud-native environments based on Java, Quarkus and Keycloak platforms.
From DevOps to SaC: a short piece of history
The term of DevOps, as a contraction of “Development” and “Operations”, emerged in the late Y2K as a response to the traditional software development process, where development and IT operations were often disconnected. It aimed at breaking down barriers between development and operations teams such that to favorize faster deployment cycles, increased collaboration and automation of the software delivery process through CI/CD platforms.
However, in these early days of DevOps, security was often an afterthought. Traditional security practices were manual and slow, to such an extent that they became a bottleneck in the DevOps process and in the whole development lifecycle. Starting with 2012, organizations realized that security had to be integrated into the DevOps workflow. The core idea was to “shift left security”, i.e. bringing it earlier in the development process. A couple of years later, in 2015, the term of DevSecOps was coined, standing for “Development, Security and Operations”, as it brought security as a shared responsibility across these three fields.
DevSecOps transformed security, from a separate team post-deployment concern, into an embedded from start, shared responsibility. IaC (Infrastructure as Code) was one of the most important approaches to inforce DevSecOps practices, by using the programming languages power in order to automate security startegies, configurations and policies. And since a continuously increasing part of the IaC was dedicated to make security repeatable, scalable and version-controlled, this part finished by becoming a separate discipline in itself and was named Security as Code (SaC).
Today SaC is considered as being the next logical maturity step for organizations already having embraced DevSecOps. As a matter of fact, if DevSecOps made security collaborative and brought it in the earliest stages of the development lifecycle, SaC makes it reliable, scalable and automated.
The IAM Service: a must-have for any SaC platform
During the software development evolution from DevOps to DevSecOps and then to SaC, the requirements around Identity and Access Management (IAM) services evolved as well. Once a secondary concern handled by infrastructure or external providers, IAM services became gradually first-class citizens of the development lifecycle, driven by the need for automated, auditable, and scalable security.
With IaC permitting the automated deployment of infrastructure at scale, managing who can access what within these systems becomes more complex and more critical. This is where IAM comes into the picture, providing the foundation for secure, role based control across cloud-native environments. In this context, IAM has become an essential service of the infrastructure automation, ensuring that only the right users, services, and machines have access to the right resources.
With the growth of DevSecOps and IaC, development teams have started more and more to get into the habit of including security policies and controls earlier in the development process. This implied to delegate authentication and authorization to centralized IAM platforms. By leveraging standards like OpenID Connect (OIDC) and OAuth 2.0, these platforms allowed developers to offload security logic from applications while still maintaining strict control over access policies. However, manually configuring IAM, as it was often the case, used to dramatically limit its scalability and its repeatability.
SaC was the critical point at which IAM configurations were no longer manually managed but instead treated as code. Among the many IAM available solutions, Keycloak, a RedHat open-source identity server, stands out as a powerful platform designed to provide centralized authentication and authorization for modern applications. With tools like Keycloak, teams can now codify realms, clients, roles, and access policies, store them in version control, and deploy them automatically using tools like Terraform, Ansible or Helm. This approach makes IAM a fully integrated, testable, and repeatable infrastructure element which guarantees consistent and traceable security across environments.
Keycloak’s extensive support for automation makes it an ideal candidate for IaC. Its CLI, REST API, and declarative configuration import / export feature allow organizations to enforce zero-trust principles, enable fine-grained access control, and maintain compliance, by incorporating Keycloak configurations into the broader DevSecOps toolchain, without sacrificing development speed. This integration ensures that identity policies evolve with the application, not as an afterthought but as a core part of the software lifecycle.
Introducing Keycloak
Keycloak is a IAM server dedicated to supply identity services to modern applications such as SPA (Single Page Application), mobile applications or REST APIs. Started at RedHat in 2014 as an open-source project, it has grown little by little into a well recognized product, with a solid community and a strong user base.
Keycloak supports industry standard protocols like OAuth 2.0, OpenID Connect and SAML 2.0, this way allowing the developers to disregard the necessity of mastering the full complexity of the authentication and authorization process, by delegating its responsibility to the server, while guaranteeing a high security level to applications that don’t have access to the users’ credentials.
It is important to mention also that Keycloak provides a wide range of authentication mechanisms, including but not limited to MFA (Multi Factor Authentication), SA (Strong Authentication), using OTPs (One Time Password), security devices, WebAuthn passwords or a combination of them all. Thanks to its session management capabilities, Keycloak is an SSO (Single Sign On) service as well, allowing users to access several applications, while only having to authenticate once.
As any IAM server, the notion of user is central to Keycloack but, as opposed to other IAM servers, Keycloak comes with its own user database. For simplicity’s sake and in order to avoid possible licensing issues, this default database is a very simple H2 file-based one that shouldn’t be used in production. Instead, any other production-ready database, like Oracle, PostgreSQL, MySQL, MariaDB, etc., may be configured. Additionally, Keycloak provides a strong caching layer designed to avoid database hits as much as possible. And as the vast majority of organizations uses LDAP directories as their single source of truth for user management and digital identities. Consequently, Keycloak supports integration with different LDAP directory implementations like Microsoft Active Directory, RedHat Directory Server, ApacheDS, OpenLDAP, etc.
SaC and Keycloak
While Keycloak itself is not SaC tool, the way to manage and deploy it and its configurations can absolutely become part of a SaC strategy. Its extensive support for automation through its CLI, REST API and declarative import/export makes it an ideal platform for SaC. Here are the most essential criteria showing how Keycloak fits into SaC:
- Configuration as code.
- Defining realms, clients, roles, users, identity providers, etc. using the
kadmscripts and storing these scripts in GIT repositories. - Defining realms, clients, roles, users, identity providers, etc. ind JSON or YAML files, storing these files in GIT repositories and importing them using the
kadmtool. - Exporting Keycloak realm configurations as JSON files, storing them in GIT repositories and re-import them during deployments.
- Defining realms, clients, roles, users, identity providers, etc. using the
- Automated deployment.
- Using OCI (Open Container Initiative) compliant images to run Keycloak and dynamically apply configurations described by versioned scripts or JSON/YAML files.
- Using tools like Terraform, Ansible, Helm or Kubernetes Operators to deploy and configure Keycloak.
- Programmatic access policies.
- Using RBAC (Resource Based Acces Control) policies as JSR 250 annotations in versioned Java code.
- Using RBAC (Resource Based Acces Control) policies as versioned JSON files.
- CI/CD integration.
- Using CI/CD pipelines to automatically test and deploy security artifacts.
- Making security repeatable, auditable and scalable.
One of the most classical scenario of implementing SaC with Keycloak would probably
include the use of kadm versioned scripts to create OAuth 2.0 clients, users,
groups, roles, authentication flows, authorization policies, etc. and automatically
applying them using OCI complinat images or tools like Terraform, Ansible, Helm
or Kubernetes Operators. However, doing the same thing by manually clicking around
the Keycloak administration console without versioning and documenting these
one-off changes, would not be SaC.
Running Keycloak
While Keycloak may be installed locally, like any other software, by downloading and uncompressing it, the easiest way to run it is as an OCI compliant image.
Here is how you can run it as a Docker image:
$ docker run -d --name keycloak \
    --rm -e KEYCLOAK_ADMIN=admin \
    -e KEYCLOAK_ADMIN_PASSWORD=admin \
    -p 8080:8080 quay.io/keycloak/keycloak:latest start-dev
This command will pull the Docker image quay.io/keycloak/keycloak:latest from
the RedHat repository and, if it isn’t already present locally, it will store it
there. Then, the Docker daemon will run it in the background (option -d), listening
for HTTP trafic on the container TCP port 8080, mapped on the same TCP port of
the host (option -p). The temporary administrator user name, as well as the
associated password, are admin (options -e KEYCLAOK_ADMIN and
-e KEYCLOAK_ADMIN_PASSWORD). Ultimately, the name of the running container
is keycloak (option --name) and, when the Docker container is stopped,
the associated image will be removed (option --rm).
You can check that everything is working as expected by executing the following command:
$ docker images
REPOSITORY                     TAG               IMAGE ID       CREATED        SIZE
...
quay.io/keycloak/keycloak      latest            152827b20b9e   2 months ago   443MB
...
The output above shows that the Docker image quay.io/keycloak/keycloak:latest
was pulled and installed locally.
$ docker ps
CONTAINER ID   NAMES      IMAGE                              PORTS                                        STATUS
...
ded779e9c153   keycloak   quay.io/keycloak/keycloak:latest   8443/tcp, 0.0.0.0:8080->8080/tcp, 9000/tcp   Up 6 seconds
...
Here you can see that the Docker container named keycloak is up and running.
You can see its log file as shown below:
$ docker logs keycloak --details --follow
Updating the configuration and installing your custom providers, if any. Please wait.
...
2025-05-15 16:06:34,954 INFO  [io.qua.dep.QuarkusAugmentor] (main) Quarkus augmentation completed in 6489ms
Running the server in development mode. DO NOT use this configuration in production.
...
Last but not least, firing your prefered browser at http://localhost:8080 and
connecting as admin/admin to the login dialog shown below:
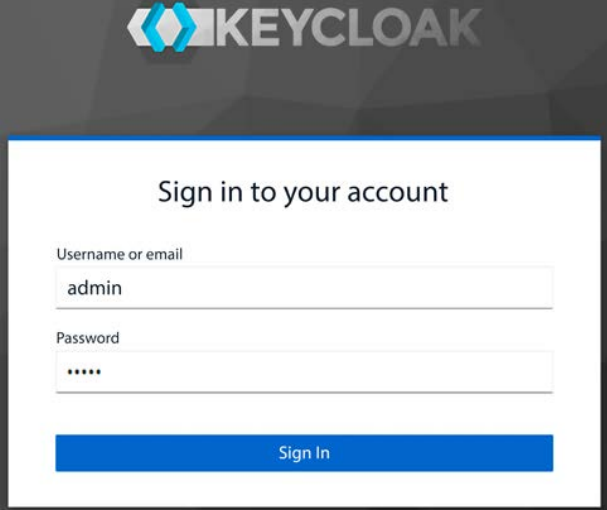
will allow you to get acces to the Keycloak administration console. This proves that your IAM server is fully operational.
Getting started with Keycloak CLI
As already mentioned above, Keycloak comes with an administration console which allows you to configure and manage the IAM server. But using this administration console wouldn’t be a SaC compliant approach because, whatever you do with it:
- isn’t repeatable;
- isn’t deterministic;
- isn’t versionable;
- isn’t auditable;
- isn’t documented;
- is repetitive;
- is error prone.
So, here is where the Keycloak CLI (Command Language Interpreter) comes into he play.
The Keycloak CLI consists in a bash script named kadm.sh, found in the bin
directory of the server. Therefore, you can run it as follows:
$ export PATH=$PATH:$KEYCLOAK_HOME/bin
$ kcadm.sh
Using this script, you can do whatever you do by clicking around the administration console, but in a controled and fully SaC compliant mode. Let’s have now a quick overview of the most essential Keycloak concepts:
- Realms. A realm is a logical namespace grouping different security artifacts like applications, services, users, groups, roles, etc. They are isolated from one another and can only manage the artifacts that they control.
- Clients. Before applications are able to use Keycloak services, they need to be registered first, as Keycloak clients. They represent basic entities that may request Keycloak authentication and authorization.
- Users. The notion of users is the same as with any other kind of server, i.e. entities able to log with Keycloak. They are stored in the Keycloak internal datrabase or, in the case of the users federation, in external LDAP directories. Users belong to and log into realms.
- Groups. Users can be grouped in user groups. This facilitates the management of their common attributes.
- Roles. Roles are permission types that can be defined at either the realm or the client level. They are assigned to specific users or user groups.
- Role mappers. These Keycloak artifacts are used in order to assign roles, i.e. sets of permissions, to specific users or user groups.
Now that we got a basic understanding of the most important Keycloak artifacts,
let’s dive into the writing of kcdm scripts that handle them. The first thing
to do when starting using Keycloak as a security provider is to create a new
realm. Here are the required steps:
Configure the temporary admin credentials.
Keycloak comes with an already configured security realm named master. As its
name implies, it the master of realms, the place where the server administrators
create their accounts allowing them to manage any other realm created on the same
server instance. So, it is used by the server itself and, while you can use it to
manage your own realm, this isn’t recommended.
When Keycloak is installed on-prem and, hence, an installation and configuration
process has been executed, the server comes with a default administrator in the
master realm. The default credentials for this administrator are admin/admin.
This isn’t the case when Keycloak is run as an OCI compliant image and, in this
case, the first thing to do before getting access to the master realm, is to
set up its temporary credentials. With Keycloak CLI, this can be done using the
following command:
$ kcadm.sh config credentials \
   --server <server-url> \
   --realm master \
   --user <user-name> \
   --password <user-password>
Of course, this command can only be executed once that the Keyclaok server has
started. Here <server-url is the full URL of the Keycloak server, for example
http://localhost:8080, while the options --user and password enable you to
define the user name and, respectivelly, the associated password of the master
realm administrator.
Creating a new realm
Having defined these temporary credentials, you can now create a new realm:
$ kcadm create realms -s realm=<realm-name> -s enabled=true
Here the -s option, for set, allows you to set up attributes values. In this
case we’re creating a new realm which name is defined by the -s realm option
and, since realm aren’t enabled by default, we need to do it using the argument
-s enabled=true.
Creating users
Now is the time to create the Keycloak users.
$ kcadm.sh create users \
   -r <realm-name> -s \
   -- username=<user-name> \
   -s enabled=true \
   -s "emailVerified=true" \
   -s "email=<user-email>" \
   -s "firstName=<user-first-name>" \
   -s "lastName=<user-last-name>"
$ kcadm.sh set-password -r <realm-name> \
    --username <user-name> \
    --new-password <user-password>
The sequence above creates a new user in the newly created realm and defines the
associated password. To be noted that users have several properties like their
associated first and last name, as well as their email address. These properties
are initialized on the behalf of -s "name=value" options. Also, the boolean
property emailVerified helps to define trusted users, which email address has
been verified after their creation.
Creating clients
Creating clients is a more complicated operations due to the large number of
properties and parameters that need to be defined. This is why, in practice,
all these parameters and properties are stored in JSON files that are used as
input for kcadm commands. Here is an example:
$ kcadm create clients -r <realm-name> -f <input-file>
In this example, <input-file> is the full path of a local JSON file containing
the description of the new client that has to be created. We’ll come back later
with more details concerning the client types as well as their properties.
Creating roles and assigning them to users
In order to assign permission to users, we’re using Keycloak roles. These roles can be assigned, as explained, to users, in which case we’re talking about realm roles, or to clients. Here is an example of creating a new realm role and to assign it to an user:
$ kcadm create roles -r <realm-name> -s name=<role-name>
$ kcadm add-roles --uusername <user-name> --rolename <role-name> -r <realm-name>
The sequence above creates a new role which name is defined by the option
-s name=<role-name> in the realm which name is defined by the option -r <realm-name>.
Then, this role is assigned to the user which name is defined by the option
--uusername <user-name>.
Once we complete these steps above, we can consider having a new realm, quite
complete, providing all the required artifacts, which should allow us to run
the sample application, as shown in the next section. Of course, the mentioned
steps don’t have to be executed manually, but we’ll demonstrate how to automate
them, in the most authentic SaC way, using tools like docker and docker-compose,
integrated with Quarkus.
Getting started with the sample application.
In order to illustrate all the concepts introduced above, we provide a sample application, available here: https://github.com/nicolasduminil/iam.git. It’s a Java application, using Quarkus, the famous supersonic and subatomic stack. It consists of several Maven modules or subprojects, as follows:
- The
front-endMaven module which deploys a web application which uses the Jakarta Faces and PrimeFaces extension for Quarkus. - The
back-endMaven module which exposes a simple REST API invoked by thefront-endmodule. - The
infraMaven module which orchestrates the others ones, including the Keycloak server.
Let’s look in a greater detail at each one of hese modules.
Technical requirements
The sample application is a Java application, accordingly you need to have Java
21 or later installed on your box. You could use different Java versions but, in
this case, you need to slightly modify the master pom.xml file such that to
align with your Java version.
You also need to have a local copy of the GitHub repository associated with the project. If you have Git installed, you can clone the repository by running this command in a terminal:
$ git clone https://github.com/nicolasduminil/iam.git
Alternatively, you can download a ZIP of the same repository mentioned above.
The sample application is using Keycloak as a IAM service, accordingly you need to have it running, either by downloading and installing it, or by running it as an OCI compliant image, using Docker, Podman or any other tool you prefer. Here, we’re using Docker and, consequently, if you want to run the sample application exactly as it is, you need a local Docker infrastructure.
And since we’re using Maven as our build engine, you need to have it installed as well.
Understanding the sample application
The sample application consists of two parts: a frontend web application and a backend REST API. The frontend web application is a classical web application, written in Java, with Quarkus and the PrimeFaces extension for Quarkus.
NOTE: The fact of having written the web application in Java, with PrimeFaces, which is an implementation of the Jakarta Faces specifications, might be surprising. As a matter of fact, it would have been more usual to write it in a JavaScript library, like Angular, Vue.js, etc. The reason we did it this way is that Jakarta Faces is a great web framework whose implementations offer hundreds of ready-to-use widgets and other visual controls. Compared with Angular, where the visual components are a part of external libraries, like Material, NG-Bootstrap, Clarity, Kendo, Nebular, and many others, Jakarta Faces implementations not only provide ways more widgets and features, but also are part of the official JSR 372 specifications and, in this respect, they are standard, as opposed to the mentioned libraries, which evolve with their authors prevailing moods, without any guarantee of consistency and stability. For more arguments in choosing Jakarta Faces implementations for web applications please see my article on DZone: https://shorturl.at/Iv01O.
As we want to focus on the features that Keycloak, as an enterprise IAM service, can offer, the sample application is very simple. Furthermore, to make it as simple as possible to run it, we’re using Quarkus.
The web application demonstrates the following features:
- It uses the Keycloak
discoveryendpoint. - It uses the OAuth 2.0
authorization codegrant type. - It uses the OpenID Connect to obtain an ID token for the given
authorization code. - It uses the OpenID Connect protocol to login against the Keycloak service.
- It shows the ID and the access token.
- It refreshes of the access token.
- It invokes the userinfo Keycloak endpoint and displays the required data.
- It invokes the public and the secured backend endpoint using the RBAC (Role Based Access Control).
The backend REST API is also very simple and is implemented with Quarkus as well. It provides a REST API with two endpoints:
/public: A publicly available endpoint with no security/secured: A secured endpoint requiring an access token with the myrealm global role
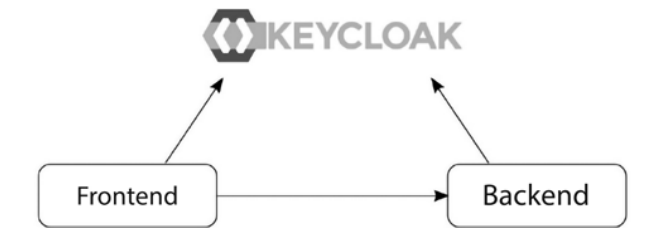
Using Quarkus with its embedded Undertow web server allows to make the code as easy to understand and as simple to run as possible for anyone familiar with the Java programming language. The following diagram shows the relationship between the frontend, the backend, and the Keycloak service. The frontend authenticates the users against the Keycloak server and then invokes the backend, which uses the Keycloak defined roles such that to validate the RBAC request:
Now let’s look at some more details on how all these pieces come together.
Running the sample application
In order to run the sample application, once you cloned the GitHub repository associated with the project, all you need is to execute the following Maven command:
$ cd <app-directory>
$ mvn clean install
Of course, if that’s the first time you’re running the sample application, then yoi don’t need the clean verb. You’ll see a whole crowd of Maven output lines and, if everything is okay, you’ll see the following build process result:
[INFO] IAM :: The Master POM .............................. SUCCESS [  0.258 s]
[INFO] IAM :: The Doamain Module .......................... SUCCESS [  1.433 s]
[INFO] IAM :: The Common Module ........................... SUCCESS [  0.760 s]
[INFO] IAM :: The Back-End Module ......................... SUCCESS [ 13.560 s]
[INFO] IAM :: The Front-End Module ........................ SUCCESS [ 12.560 s]
[INFO] IAM :: The Infrastructure Module ................... SUCCESS [ 40.865 s]
[INFO] ------------------------------------------------------------------------
[INFO] BUILD SUCCESS
[INFO] ------------------------------------------------------------------------
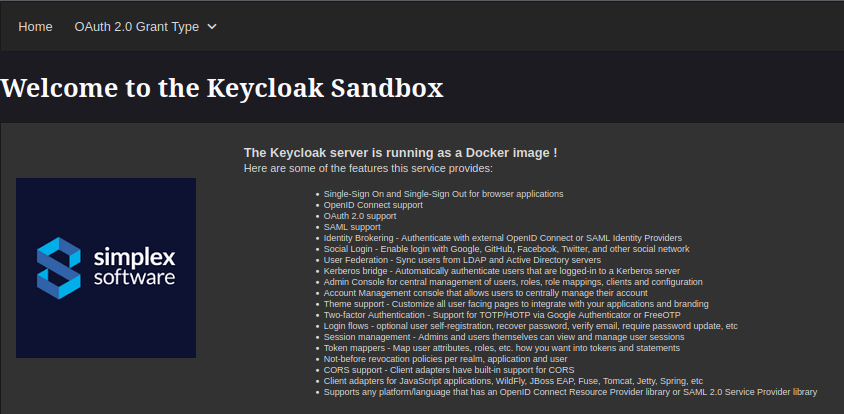
The durations shown above might be different in your case. Now, you can start the
front-end application by firing your preferd browser at http://localhost:8082.
You should see the following welcome screen:
I took the greatest care and attention while designing the front-end such that
not only to showcase the Keycloak most important features, but also to demonstrate
the suitability of the Jakarta Faces compliant implementations, in this case
PrimeFaces, for UI based applications. And as you’ll see later when we’ll examine
the front-end details, this specification, together with its implementations,
provides a way more robust architecture than the one offered by any JavaScript
based libraries.
So, let’s start now exploring this UI. A menu available in the menu bar allows you to select the desired OAuth 2.0 grant type and proposes the following options:
- authorization code;
- resource owner password;
- client credentials.
First, you need to know that the OAuth 2.0 protocol defines grant types as being standardized methods that define how a client application can obtain authorization to access protected resources. They represent different flows through which an application can receive an access token to act on the behalf of an user. The RFC 6749 (https://datatracker.ietf.org/doc/html/rfc6749) provides all the required details.
So, our sample application allows you to exercice all these grant types. To
beggin, hover your mouse over the menu labeled OAuth 2.0 Grant Types and select
the first menu item named Authorization code. You’ll see the following dialog
box in the lower part of the screen:
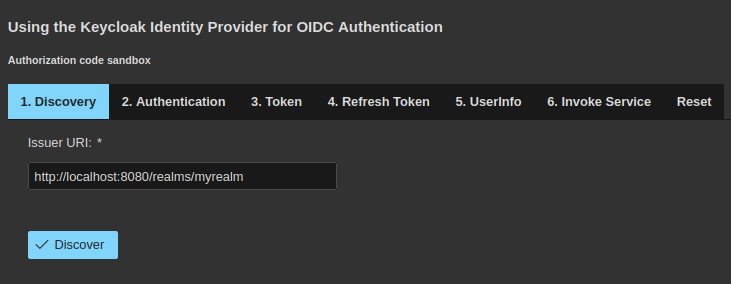
As you can notice, several ordered steps are proposed to you, in the manner of
a simplified workflow. Start by the first one labeled Discovery and click on
the button having the same name. A new input text area will be displayed, containing
all the functional endpoints proposed by the Keycloak server.
The Discovery function is an optional specification that an OAuth 2.0 provider
can decide if it wants to implement or not. This idea comes from the necessity
to associate REST endpoints to the OAuth 2.0 standard features. Instead of
defining these endpoints at the specification level, which would certainly weigh
them down a lot, the implementors are free to craft them how they want. And since
they would be different from an implementation to another one, the server has to
provide the Discovery endpoint which, when invoked, will return all the other
endpoints attached to OAuth 2.0 standard operations.
In our case, you can find in the new displayed input text area control labeled
Keycloak OpenID Connect provider configuration, the following entries:
authorization_endpoint: the URL to use for authentication requests;token_endpoint: the URL to use for token requests;introspection_endpoint: the URL to use for introspection requests;userinfo_endpoint: the URL to use for UserInfo requests;grant_types_supported: the list of supported grant types;response_types_supported: the list of supported response types;- etc.
Spend a short moement to scroll down among the endpoints that the Keycloak server
makes available and that the Discovery returns as metadata. Then, continue with
the next step of our workflow and click on the Authentication tab.The following
dialog box will display:
Here you need to provide all the information for the use of the authorization
codegrant type. We’ll come back with finer details concerning this grant type,
and all the others, for now just proceed as follows:
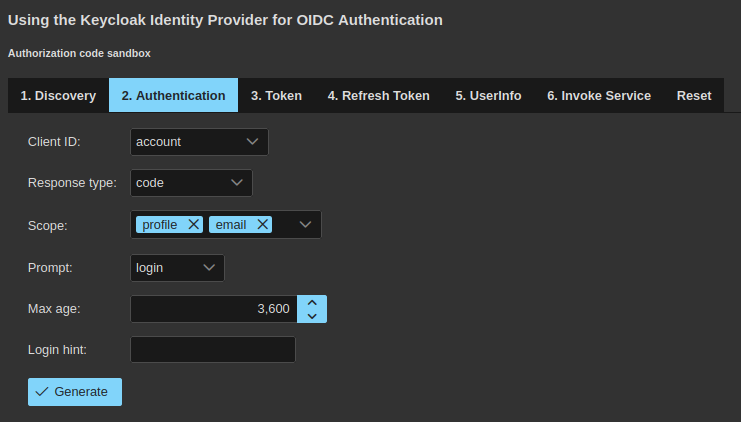
- in the combo list box labeled
Client IDselectfe-facc; this is the ID of the Keycloak client on the purpose prepared for this kind of gran type (more on that later); - select
code, if not already selected, in the combo list box labeledResponse type; - accept the default value of
profile emailfor the combo check box labeledScope; the scopeOIDCis mandatory for Keycloak so it will be added automatically; - accept the default value of
loginfor the combo list box labeledPrompt; - accept the default value of
3600for the input text contrl namedMax age; - keep empty the input text control labeled
Login hintor, if you prefer, you could type injohn, which is the user name you need to use for authentication purposes.
Now click on the Generate button and the following HTTP request will appear in
the input text area labeled Authorization request:
http://quarkus.oidc.client-idlocalhost:8080/realms/myrealm/protocol/openid-connect/auth
  client_id=fe-facc
  redirect_uri=http://localhost:8082/callback
  scope=profile+email+openid
  response_type=code
  prompt=login
  max_age=3600
This allows you to better understand how the authorization code grand type
works. Please notice that the quarkus.oidc.client-idlocalhos host name above
is the name associated by the DNS (Domain Name Service) to localhost.
Now, that you have seen what the authorization code request looks like, send
it by clicking the Send authorization request button. At this point, the
Keycloak service will take the helm and will display the login dialog. Type john
as the user name and password1 as the password. The authentication process
against the Keycloak service should succeed and you should see now the response
to the authorization code request. It’s a very long character string without any
particular mening other the the ability to be exchanged against an ID token.
Now, click on the Token tab and, in the new displayed dialog box, click on
the Send token request button. You’ll be presented with three input text areas,
the first of which will contain the following HTTP request sent to the Keycloak
server in order to obtain the access token:
http://quarkus.oidc.client-idlocalhost:8080/realms/myrealm/protocol/openid-connect/token
  client_id=fe-facc
  redirect_uri=http://localhost:8082/callback
  scope=email+profile+openid+openid
  client_secret=********************************
  code=a647bb3d-3...
Please notice the token endpoint which is realms/myrealm/protocol/openid-connect
/token. The authorization code provided in the request under the code parameter
has been truncated since it is too long and irelevant foe humans.
The 2nd input text area in the dialog is the JWT (JSON Web Token) header which only fields meaningfull for us are:
alg: the algorithm used for the token encoding which, in this case, is RS256;typ: the type of the token which, in this case, is JWT.
Last but not least, the 3rd input area text contains the JWT payload, as shown below:
{
  "exp": 1748451175,
  "iat": 1748450875,
  "jti": "f47e28a8-1106-43fa-bc55-29c69735d005",
  "iss": "http://localhost:8080/realms/myrealm",
  "aud": "fe-facc",
  "sub": "139d80d5-0cf9-4edb-a2ab-8aed2c121acd",
  "typ": "ID",
  "azp": "fe-facc",
  "sid": "a2fbba19-3ec2-45c4-866b-0179502d3a76",
  "at_hash": "SVG6Dl6cqfTy6IxzBy1urw",
  "email_verified": true,
  "realm_access": {
      "roles": [
          "default-roles-myrealm",
          "manager",
          "offline_access",
          "uma_authorization"
      ]
  },
  "name": "John Doe",
  "preferred_username": "john",
  "given_name": "John",
  "family_name": "Doe",
  "email": "john.doe@emailcom"
}
The listing above shows the structure of a JWT payload. The JSON elements that you’re seeing are called claims. Here are the most important ones:
iss: this is the issuer URL, in our case the Keycloak realm;aud: the audience; identifies the intended recipients or consumers of the token, essentially, who is meant to accept and process this token; it typically matched theclient_id;typ: the token type, in our case an OpenID Connect token;azp: the authorized party; represents the party to whom the ID token was issued, in this case the OAuth 2.0 client having the IDfe-facc;realm-access: the parent element encapsulating the properties which define the acess rules to a Keycloak realm;roles: this is a Keycloak specific claim that represents the user’s realm-level roles. The rolesdefault-roles-myrealm,offline_accessanduma_authorizationare standard, automatic roles, whilemanageris a custom one, used in our application, for RBAC purposes;
The remaining claims, from name to email are self explaining.
Okay, so we got an authorization code, we exchanged it against an ID token on
the behalf of the OpenID Connect protocol,by logging in to Keycloak as user
john and we examined these token content. As a JWT, the token has a header and a payload.
Let’s try now tro refersh our access token. Click on the Refresh tab and, then,
on the Send refresh request button. The following dialog will be shown on the screen.
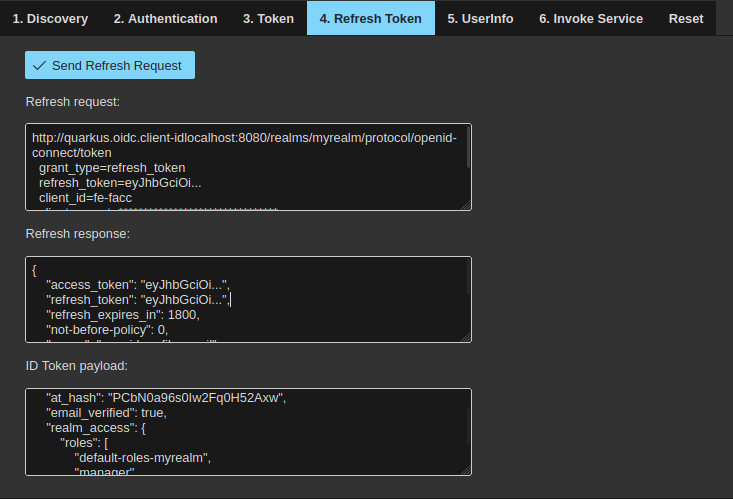
Here you can see that, in order to refresh the JWT, the following request has been sent to the Keycloak server:
http://quarkus.oidc.client-idlocalhost:8080/realms/myrealm/protocol/openid-connect/token
  grant_type=refresh_token
  refresh_token=eyJhbGciOi...
  client_id=fe-facc
  client_secret=********************************
  scope=profile+email+openid
We’re passing the refresh token received during the initial authentication as a
request parameter, together with the client ID and secret. Also, please notice
that, this time, the grant type is refresh_token. And here is the server’s
response:
{
  "access_token": "eyJhbGciOi...",
  "refresh_token": "eyJhbGciOi...",
  "refresh_expires_in": 1800,
  "not-before-policy": 0,
  "scope": "openid profile email",
  "id_token": "eyJhbGciOi...",
  "token_type": "Bearer",
  "session_state": "70abc3f9-75b1-45a6-893f-4a0ceae68c89",
  "expires_in": 300
}
In order to save space, we replaced the irrelevant token content by “…”. But don’t be confused, even if the ID, access and refresh tokens start all with a similar header, there full content isn’t the same.
Let’s see the UserInfo feature now. Remember that this endpoint is a standard
part of the OpenID Connect protocol, built as an identity layer on top of OAuth 2.0.
Click on the UserInfo tab and, then, on the button labeled Send UserInfo
Request. You’ll see the following request displayed:
http://quarkus.oidc.client-idlocalhost:8080/realms/myrealm/protocol/openid-connect/
and the following response:
{
  "sub": "25c7280c-4dc4-4fcf-b482-7693daa1971f",
  "email_verified": true,
  "realm_access": {
    "roles": [
        "default-roles-myrealm",
        "manager",
        "offline_access",
        "uma_authorization"
    ]
  },
  "name": "John Doe",
  "preferred_username": "john",
  "given_name": "John",
  "family_name": "Doe",
  "email": "john.doe@emailcom"
}
The last thing you can do is to invoke the backend service, by clicking on the
Invoke service tab and, then, on the Invoke public service and, respectively,
Invoke secure service button. The services response messages will be displayed
proving this way that the RBAC works as expected. More on that later.
Okay, so we went around the OAuth 2.0 authorization code grant type, let’s
have a look now at the other two. In the menu bar, hover the OAuth 2.0 Grant
Types menu and, this time, select the Resource owner password menu item.
You’ll see the following dialog box:
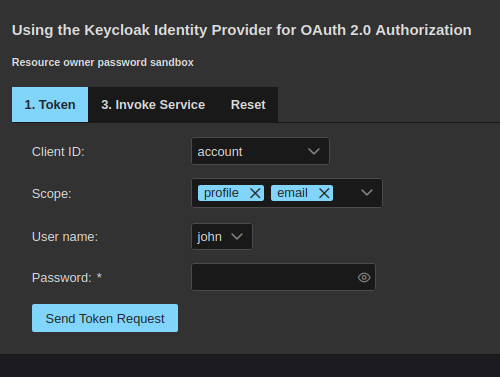
In this dialog box you need to select the fe-ropc client ID in the combo list
box labeled Client ID and to type the password password1 in the text field
with the same name. Then click the button Send token request. You’ll see the
screen below:
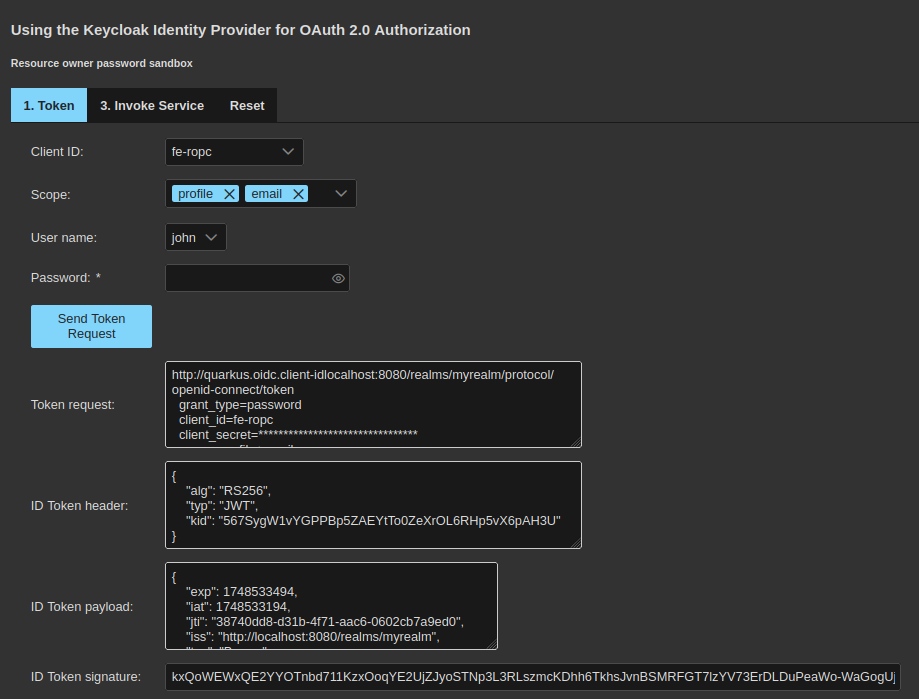
Now the JWT request, header and payload, that we have already discussed previously,
will be displayed. The Invoke service function will work now exactly as in the
case of the authorization code grant type.
Reset again the go to the Client credentials tab. Here, select the client ID
fa-sac and click the Send token request button. The same JWT request, header
and payload, that you have already seen several times precedently, will be again
displayed.
This concludes our Keycloak showcase with the OpenID Connect protocol and the OAuth 2.0 grant types.
NOTE: During your exercises with the example application, you might spend some time with different operations and your authorization code might expire. Please notice that the property
max_ageof theauthorization_codeisn’t related to theauthorization_codevalidity but specifies the maximum time, since the user’s last auhentication, that the Keycloak server will accept. Theauthorization_codeis much shorter, usually around 30 - 60 seconds. So, should you spent longer than that with different operations, then you need to either get a newauthorization codeand, then, to refresh the tokens, or to simply restart the applications using the command:mvn -pl infra exec:exec@restart. This command will restart your containers. If you prefer to stop your Keycloak service, to start it again and to reconfigure the realm, then the following command is for you:mvn -pl infra exec:exec@stop exec:exec@start.