Building a Containerized Quarkus API on AWS ECS/Fargate with CDK
In a three articles series published recently on this site (Part 1, Part 2, Part 3), I’ve been demonstrating the power of the AWS Cloud Development Kit (CDK) in the Infrastructure as Code (IaC) area, especially when coupled with the ubiquitous Java and its supersonic / subatomic cloud-native stack: Quarkus.
While focusing on the CDK fundamentals in Java, like Stack and Construct,
together with their Quarkus implementations, this series was a bit frugal as far
as the infrastructure elements were concerned. Indeed, for the sake of the clarity
and simplification, the infrastructure used to illustrate how to use the CDK with
Java and Quarkus was inherently consensual. Hence, the idea of a new series, of
which this article is the first one, a series less concerned by CDK internals
and more dedicated to the infrastructure itself.
This first article demonstrates how to build and deploy a modern, cloud-native customer management system using Quarkus, AWS CDK, and ECS/Fargate. It covers the complete journey from application development to infrastructure as code, containerization and comprehensive testing strategies. Once again, it doesn’t emphasise on the exposed API and its possible business value, but rather on the infrastructure elements required in order to provide the global solution in practice.
Architecture Overview
The diagram below shows an overview of the project’s architecture:
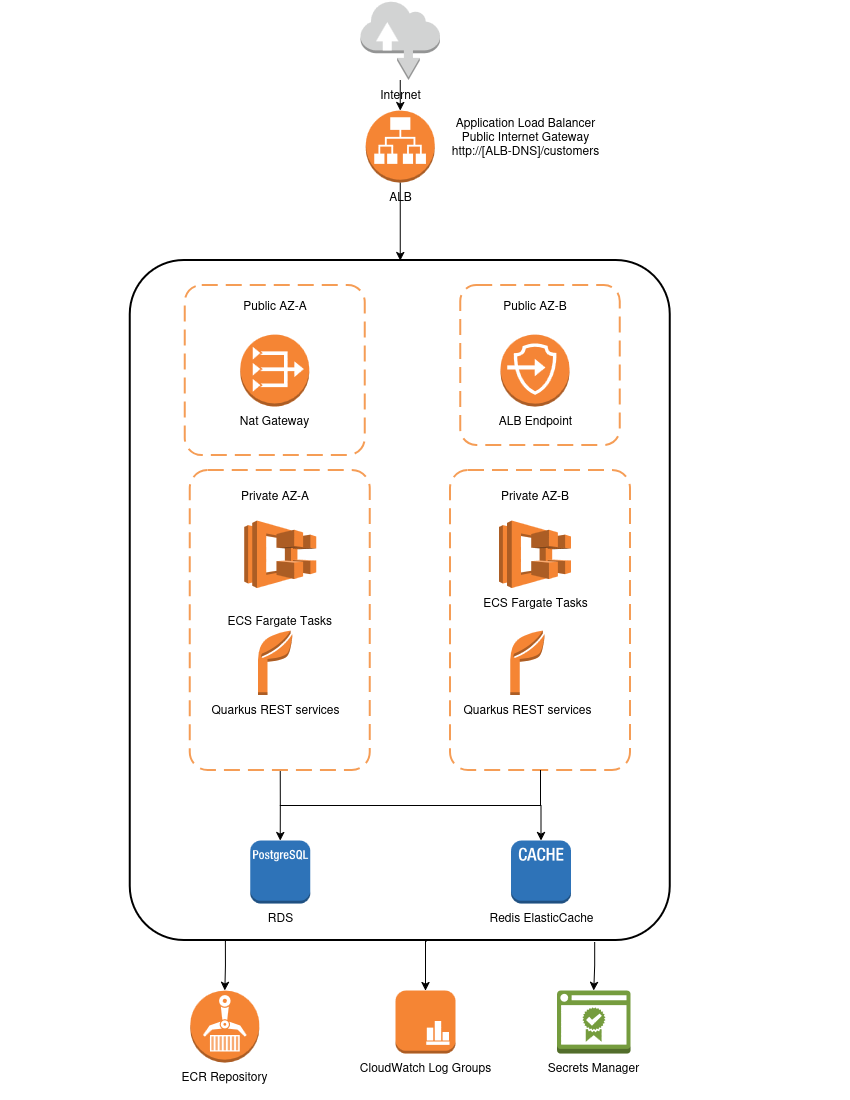
This presented solution implements the following architecture layers:
- Presentation Layer : A Quarkus REST API exposing, as an example, a couple of simple customer management endpoints.
- Application Layer : A Quarkus main application running on ECS Fargate
- Data Layer : PostgreSQL (RDS) for persistence, Redis (ElastiCache) for caching
- Infrastructure Layer (Iaas): The AWS CDK-managed cloud infrastructure implemented in Quarkus
Let’s try now to look in more details at these layers.
The Presentation Layer
This layer is a Quarkus REST API which exposes a couple os simple endpoints to CRUD customers. More than a real business API, this one is an example allowing to illustrate how containerized applications could be deployed and hosted in an AWS ECS (Elastic Container Service).
In order to separate concerns, our Maven project is structured in two modules:
- the
customer-service-ecs-apimodule which implements the Quarkus REST API to be deployed and executed as a Docker image in the AWS ECS service; - the
customer-service-exce-cdkmodule which bootstraps the CDK and creates the required elements in order to implement the cloud infrastructure presented in the figure above.
The Presentation Layer is contained in the customer-service-ecs-api module.
The exposed REST API is simple and consists in the following endpoints to CRUD
Customer entities:
GET /customers: returns a response containing the list of the currently existent customers;POST /customers: creates a new customer by persisting the entity passed in the request’s body;PUT /customers/{id}: updates the existent customer having the ID equal to the one passed as theidparameter. If such a customer doesn’t exist then HTTP 404 is returned.GET /customers/{id}: returns a response containing the customer having the ID equal to the one passed as theidparameter. If such a customer doesn’t exist then HTTP 404 is returned.DELETE /customers/{id}: deletes the customer having the ID equal to the one passed as theidparameter. If such a customer doesn’t exist then HTTP 404 is returned.
The endpoints above are implemented in the class CustomerResource which is a
CDI (Context Dependency Injection) bean, annotated with @ApplicationScoped. This
is a very realistic example of using CDI in AWS deployed infrastructure elements.
The Application Layer
This layer is the “brain” of the system, the place where the actual customer
management business logic resides, separated from how it is exposed by the
presentation layer. In our project it is included in the module customer-service
-ecs-api as well and it consists in:
- the
Customerentity which is the domain model representing the business object; - the
CustomerServiceclass containing the core business logic to CRUD operations; - the caching strategies using Redis;
- the transaction management;
- the business rules and validation logic;
We mentioned precedently that the CustomerResource class, as the pilar of the
presentation layer, is a CDI bean and, as such, it injects another CDI bean, the
CustomerService class, which performs the effective CRUD operations on Customer
business objects, using Quarkus Panache. The listing below shows the Customer
entity:
@Entity
@Table(name = "customers")
public class Customer extends PanacheEntity
{
  @NotBlank
  public String firstName;
  @NotBlank
  public String lastName;
  @Email
  @NotBlank
  public String email;
  public String phone;
  public String address;

  public Customer(){}
  ...
}
As you can see, the validation rules are expressed using Jakarta Validation constraints.
Given this very simplified representation of a customer, the CustomerService
class uses the PanacheEntity methods to CRUD customers, as shown below:
@ApplicationScoped
public class CustomerService
{
  @Inject
  RedisDataSource redisDS;

  @Transactional
  public Customer create(Customer customer)
  {
    customer.persist();
    invalidateCache("customers:all");
    return customer;
  }

  public List<Customer> findAll()
  {
    return Customer.listAll();
  }

  public Customer findById(Long id)
  {
    ValueCommands<String, Customer> cache = redisDS.value(Customer.class);
    Customer cached = cache.get("customer:" + id);
    return Optional.ofNullable(cached).orElseGet(() -> {
      Customer customer = Customer.findById(id);
      if (customer != null)
        cache.setex("customer:" + id, 300, customer);
      return customer;
    });
  }

  @Transactional
  public Customer update(Long id, Customer updates)
  {
    return Optional.ofNullable((Customer) Customer.findById(id))
      .map(customer ->
      {
        customer.updateFrom(updates);
        invalidateCache("customer:" + id);
        invalidateCache("customers:all");
        return customer;
      })
      .orElse(null);
  }

  @Transactional
  public boolean delete(Long id)
  {
    boolean deleted = Customer.deleteById(id);
    if (deleted)
    {
      invalidateCache("customer:" + id);
      invalidateCache("customers:all");
    }
    return deleted;
  }

  private void invalidateCache(String key)
  {
    redisDS.key().del(key);
  }
}
Nothing very spectacular here, just an usual Quarkus Panache service to CRUD
customers. As you can see, the transaction management that we mentioned previously
are implemented on the behalf of the @Transactional annotation provided by
the Jakarta Transaction specification, implemented by Quarkus.
The application layer isn’t directly invoked but through the API endpoints, in the
CustomerResource class, for example:
  ...
  @POST
  public Response create(@Valid Customer customer)
  {
    return Response.status(Response.Status.CREATED)
      .entity(customerService.create(customer)).build();
  }
  ...
The endpoint above is invoked through HTTP by a REST client and, in turn, it calls
CustomerService. And talking about REST clients, we also provide a MicroProfile
(MP) REST Client, which aims at facilitating the integration, by giving the API
consumers an easy and practical way to invoke it. Look at the interface
CustomerClient below:
@RegisterRestClient(configKey = "customers-api")
@Path("/customers")
@Produces(MediaType.APPLICATION_JSON)
@Consumes(MediaType.APPLICATION_JSON)
public interface CustomerClient
{
  @POST
  Response createCustomer(Customer customer);
  @GET
  @Path("/{id}")
  Response getCustomer(@PathParam("id") Long id);
  @GET
  public Response getCustomers();
  @PUT
  @Path("/{id}")
  Response updateCustomer(@PathParam("id") Long id, @Valid Customer customer);
  @DELETE
  @Path("/{id}")
  Response delete(@PathParam("id") Long id);
}
For those not yet familiar with the MP REST Client specification and its Quarkus implementation, this interface is all you need in order to probe your API. I’ll come back later to it when we’ll discuss testing.
Let’s look now at the infrastructure layer.
The Infrastructure Layer
This layer makes the object of the 2nd project’s module: customer-service-ecs-cdk.
It consists of a Quarkus main class, named CustomerManagementMain, shown below:
@QuarkusMain
public class CustomerManagementMain
{
  public static void main(String... args)
  {
    Quarkus.run(CustomerManagementApp.class, args);
  }
}
This class is the entry point class that bootstraps the Quarkus CDK application.
It uses @QuarkusMain to define the main method and delegates to Quarkus runtime
to run the CustomerManagementApp class, shown below;
@ApplicationScoped
public class CustomerManagementApp implements QuarkusApplication
{
  private CustomerManagementStack customerManagementStack;
  private App app;

  @Inject
  public CustomerManagementApp (App app, CustomerManagementStack customerManagementStack)
  {
    this.app = app;
    this.customerManagementStack = customerManagementStack;
  }

  @Override
  public int run(String... args) throws Exception
  {
    Tags.of(app).add("project", "Containerized Customer Management Application on ECS/Fargate");
    Tags.of(app).add("environment", "development");
    Tags.of(app).add("application", "CustomerManagementApp");
    customerManagementStack.initStack();
    app.synth();
    return 0;
  }
}
This class is the main application class, as opposed to the Quarkus main class. It orchestrates the CDK stack creation by:
The main application class implementing QuarkusApplication. It orchestrates the CDK stack creation by:
- injecting the CDK App and CustomerManagementStack via CDI;
- adding global tags to the CDK app for project identification;
- initializing the stack infrastructure;
- synthesizing the CloudFormation templates;
The class CustomerManagementStack, too long to be reproduced here, defines the
CDK stack to be deployed. This stack consists in the following AWS infrastructure:
- a VPC (Virtual Private Cloud) with a public and a private subnet across multiple AZs (Availability Zone);
- a NAT (Network Address Translation) gateway to outbound the internet access for private resources;
- an RDS (Relational Database Service) with a PostgreSQL database with automated backups and secrets’ management;
- a Redis cluster using AWS ElastiCache for in-memory caching and performance optimization;
- an ECS (Elastic Container Service) Fargate serverless container hosting platform;
- an ALB (Application Load Balancer) for the traffic distribution and health checking;
- a Secrets Manager for the secure credential store and rotation;
- all the required security groups and network level access control;
- a CloudWatch log group for monitoring;
- the required IAM (Identity and Access Management) roles for the fine-grained permission management;
The Java CDK provides the familiar pattern Builder which makes easy to instantiate complex structures and class hierarchies. The code excerpt below provides an example:
    ApplicationLoadBalancedFargateService fargateService =
      ApplicationLoadBalancedFargateService.Builder.create(this, "CustomerService")
        .cluster(cluster)
        .cpu(config.ecs().cpu())
        .memoryLimitMiB(config.ecs().memoryLimitMiB())
        .desiredCount(config.ecs().desiredCount())
        .taskImageOptions(ApplicationLoadBalancedTaskImageOptions.builder()
          .image(ContainerImage.fromRegistry(imageName))
          .containerPort(containerPort)
          .logDriver(LogDriver.awsLogs(AwsLogDriverProps.builder()
            .logGroup(logGroup)
            .streamPrefix(config.logging().streamPrefix())
            .build()))
          .environment(Map.of(
            "QUARKUS_DATASOURCE_JDBC_URL",
              "jdbc:postgresql://" + database.getInstanceEndpoint().getHostname() +
              ":5432/" + config.database().databaseName(),
            "QUARKUS_REDIS_HOSTS", "redis://" + redis.getPrimaryEndpoint() + ":6379"
          ))
          .secrets(Map.of(
            "QUARKUS_DATASOURCE_USERNAME",
              Secret.fromSecretsManager(database.getSecret(), "username"),
            "QUARKUS_DATASOURCE_PASSWORD",
              Secret.fromSecretsManager(database.getSecret(), "password")
          ))
          .build())
        .publicLoadBalancer(true)
        .healthCheckGracePeriod(Duration.seconds(config.ecs().healthCheckGracePeriodSeconds()))
        .serviceName(config.ecs().serviceName())
        .minHealthyPercent(100)
        .build();
This code sequence uses different builders in order to instantiate a full ECS
Fargate serverless hosting platform. Given the high number of parameters that
this process requires, the InfrastructureConfig interface, here below, provides
a type-safe Quarkus @ConfigMap.
@ConfigMapping(prefix = "cdk.infrastructure")
public interface InfrastructureConfig
{
  VpcConfig vpc();
  EcsConfig ecs();
  DatabaseConfig database();
  RedisConfig redis();
  LoggingConfig logging();
  interface VpcConfig
  {
    @WithDefault("2")
    int maxAzs();
    @WithDefault("1")
    int natGateways();
  }
  interface EcsConfig
  {
    @WithDefault("256")
    int cpu();
    @WithDefault("512")
    int memoryLimitMiB();
    @WithDefault("2")
    int desiredCount();
    @WithDefault("60")
    int healthCheckGracePeriodSeconds();
    @WithDefault("customer-service")
    String serviceName();
  }
  interface DatabaseConfig
  {
    @WithDefault("BURSTABLE3")
    String instanceClass();
    @WithDefault("MICRO")
    String instanceSize();
    @WithDefault("customers")
    String databaseName();
    @WithDefault("postgres")
    String secretUsername();
    @WithDefault("false")
    boolean deletionProtection();
  }
  interface RedisConfig
  {
    @WithDefault("cache.t3.micro")
    String nodeType();
    @WithDefault("1")
    int numNodes();
    @WithDefault("customer-cache")
    String clusterId();
    @WithDefault("Redis cache for customer service")
    String description();
  }
  interface LoggingConfig
  {
    @WithDefault("/ecs/customer-service")
    String logGroupName();
    @WithDefault("ONE_WEEK")
    String retentionDays();
    @WithDefault("ecs")
    String streamPrefix();
  }
}
This @ConfigMap defines nested configuration structures for different
infrastructure components and @WithDefault annotations for default values and
provides compile-time configuration validation while organizing settings into
logical groups like VPC, ECS, database, Redis, and logging.
CDK Configuration and Deployment
AWS CDK uses the cdk.json file as its primary configuration mechanism to define
how the CDK application should be executed and deployed. This file serves as the
entry point that tells the CDK toolkit how to run the infrastructure application.
Here below is the file cdk.json used for this project:
{
  "app": "java -jar target/quarkus-app/quarkus-run.jar",
  "context": {
    "aws-cdk:enableDiffNoFail": true,
    "@aws-cdk/aws-ecs:minHealthyPercent": true
  },
  "requireApproval": "never",
  "output": "cdk.out",
  "progress": "bar",
  "ci": true,
  "verbose": false,
  "acknowledgements": {
    "@aws-cdk/aws-ecs:ecrImageRequiresPolicy": true,
    "@aws-cdk/aws-ecs:minHealthyPercent": true,
    "34892": true
  },
  "notices": false
}
Looking at this file, several categories of key aspects are to be brought into focus:
- The
appelement: defines the command which executes the application. Our application being a Quarkus one, theappelement reflects that by defining the standard way to run a Quarkus JVM application. - The
contextelement: stores environment specific settings. In our case:"aws-cdk:enableDiffNoFail": truecontrols the behavior of thecdk diffcommand such that to continue the execution even if it encounters errors, for example missing permissions to describe resources, etc."@aws-cdk/aws-ecs:minHealthyPercent": trueis an ECS specific flag that enables theminHealthyPercentproperty for ECS services. Here, it allows setting the minimum percentage of healthy tasks during deployments (e.g., 50% for rolling updates).
- The feature flags: control CDK behavior and enables/disables specific features. In our case:
"requireApproval": "never"says that the CDK will never prompt for manual approval duringcdk deployoperations."output": "cdk.out"sets the directory where the CloudFormation templates, generated by thecdk synthcommand, will be stored."progress": "bar"shows progress bar during CDK operations instead of detailed logs."ci": trueoptimizes output for CI/CD environments (less interactive, more structured)."verbose": falsesuppresses detailed debug information during execution."notices": falsedisables CDK notices about new features or deprecations.
- The acknowledgements:
"@aws-cdk/aws-ecs:ecrImageRequiresPolicy": trueacknowledges that ECR images require IAM policies for access;"@aws-cdk/aws-ecs:minHealthyPercent": trueconfirms understanding of ECS health check behavior"34892": trueacknowledges specific CDK issue/warning (likely related to a GitHub issue number)
This cdk.json file is used by the CDK toolkit to:
- Synthesis: execute the app command to generate CloudFormation templates in
cdk.out. - Deployment: use the synthesized templates to deploy infrastructure to AWS.
- Context Management: cache AWS account/region specific information for consistent deployments.
Running and testing
There are several test categories that come with the project, as follows:
- integration tests;
- system integration tests;
- Open API / Swagger tests;
- end-to-end tests.
As you can see, we don’t provide unit tests because we think that this category of tests is completely useless. But this is another topic which doesn’t belong to the scope of this article.
The Integration tests
These tests aim at testing the complete REST API layer with the Quarkus runtime. They use the test infrastructure automatically provide by the Quarkus Dev Services with an in-memory H2 database, in order to validate the API contracts, the requests/responses and the business logic integration.
The class CustomerResourceTest is one test in this category. It is executed
by the maven-surefire-plugin in the Maven test phase, hence its naming
convention: *Test.
@QuarkusTest
public class CustomerResourceTest
{
  @Test
  void testCreateCustomer()
  {
    given()
      .contentType(ContentType.JSON)
      .body("""
        {
          "firstName": "John",
          "lastName": "Doe",
          "email": "john@example.com"
        }
      """)
      .when()
      .post("/customers")
      .then()
      .statusCode(201)
      .body("firstName", equalTo("John"));
  }
  ...
}
We reproduced here only one test method, the one creating new customers. Feel free to extensively look at this class which uses the RESTassured library as REST client.
Another integration test is the class CloudFormationTemplateIT. As opposed to
the previous one, this class is executed by the maven-failsafe-plugin in the
Maven verify phase. The reason is that it needs to be run after the cdk synth
command, executed by the exec-maven-plugin. This command synthesizes the required
AWS infrastructure in the form of a CloudFormation template, stored in the directory
cdk.out. Then the test class checks the files in this directory for the presence
and the validity of these AWS infrastructure elements.
In order to perform the integration test:
$ cd aws-cdk-quarkus
$ mvn clean verify
The Maven command above will execute, in addition to the integration tests, the system integration tests.
The System Integration Tests
These tests are a more realistic version of the integration ones. As opposed to
the former ones, which were relying on a Quarkus runtime related infrastructure,
these tests are more realistic in the sense that they are performed against a
local, while production similar, containerized infrastructure. During the Maven
verify phase, the exec-maven-plugin executes the docker-compose.yaml file against
the currently running Docker daemon and starts all the required services, as follows:
- a PostgreSQL database;
- the
adminertool to administrate the database; - a Redis node for in-memory caching purposes;
- the
redis-insighttool to administrate the local Redis instance; - the customer management API as a Quarkus application.
Once all this infrastructure is started, the CustomerResourceIT class uses the
CustomerClient to test the API running locally. The usage of the MP REST Client
isn’t mandatory, of course, other REST clients, like RESTassured or simply Jakarta
REST Client, can be used. However, the MP REST Client is, in my opinion, the
simplest and the most effective solution.
@QuarkusTest
@TestProfile(IntegrationTestProfile.class)
public class CustomerResourceIT
{
  @Inject
  @RestClient
  CustomerClient customerClient;

  @Test
  void testCreateCustomer()
  {
    Customer customer = new Customer("John", "Doe", "john@example.com",
      "000000000000", "123 Main St");
    Response response = customerClient.createCustomer(customer);
    assertThat(response.getStatus()).isEqualTo(201);
    customer = response.readEntity(Customer.class);
    assertThat(customer.firstName).isEqualTo("John");
    assertThat(customer.lastName).isEqualTo("Doe");
    assertThat(customer.email).isEqualTo("john@example.com");
  }
  ...
}
As you can see, the test is using a Quarkus customized profile, named
IntegationTestProfile, shown below:
public class IntegrationTestProfile implements QuarkusTestProfile
{
  @Override
  public Map<String, String> getConfigOverrides()
  {
    return Map.of(
      "quarkus.datasource.db-kind", "postgresql",
      "quarkus.datasource.username", "nicolas",
      "quarkus.datasource.password", "dev123",
      "quarkus.datasource.jdbc.url", "jdbc:postgresql://localhost:5432/customers",
      "quarkus.datasource.devservices.enabled", "false",
      "quarkus.redis.hosts", "redis://localhost:6379",
      "quarkus.redis.devservices.enabled", "false"
    );
  }
}
The Swagger tests
The module customer-service-ecs-api exposes a Swagger interface that you can
use to manually test the API. Just fire your preferred browser at
http://localhost:8080/q/swagger-ui and you’ll be presented with that:
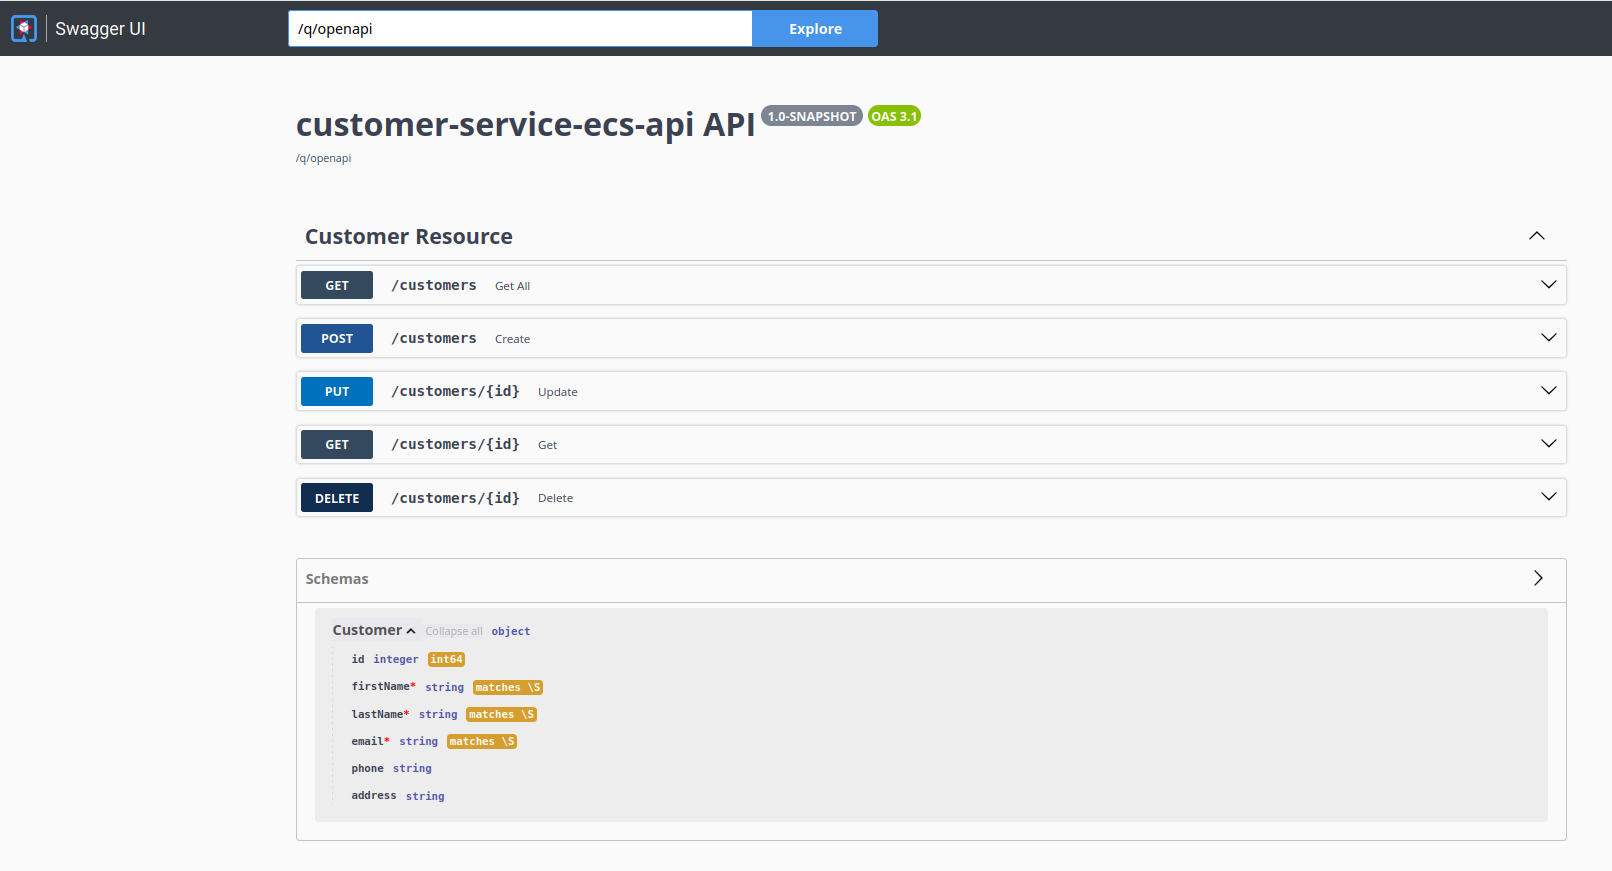
This will allow you to probe your API.
The E2E Tests
The last test category is the end-to-end one. These tests have the particularity
to be performed against the real AWS services (ECS, RDS, ElasticCache, etc.).
The class CustomerServiceE2EIT is such a test. It’s similar to the integration
test CustomerResourceTest in the sense that it uses RESTassured to probe the
API but, instead of invoking local endpoints, it invokes endpoints onto the real
API deployed on the AWS Fargate platform and executed as a Docker image.
Everything happens in the code sequence below:
  @BeforeAll
  static void setup()
  {
    cfClient = CloudFormationClient.builder()
     .region(Region.EU_WEST_3)
     .build();
    String loadBalancerUrl = getStackOutput("QuarkusCustomerManagementStack", "CustomerServiceLoadBalancerDNS");
    RestAssured.baseURI = "http://" + loadBalancerUrl;
    RestAssured.port = 80;
    System.out.println(">>> Connecting to: " + RestAssured.baseURI + ":" + RestAssured.port);
    waitForServiceReady();
  }
This method orchestrates the connection to teh AWS environment. It creates a
CloudFormation client configured for the EU-WEST-3 region where the infrastructure
is deployed. Then it queries the deployed CloudFormation stack to retrieve the
ALB DNS name, eliminating hardcoded URLs and ensuring tests always connect to
the correct deployed instance. The RESTassured client is configured with the
dynamically discovered ALB URL and the standard HTTP port (80). The remaining
is very similar to what we did in CustomerResourceTest and CustomerResourceIT.
The method waitForServiceReady() is, however, new and ensure the the ECS service
is fully operational before running the tests, preventing this way false failures
due to deployment timing.
To run the E2E tests execute the following Maven command:
$ cd aws-cdk-quarkus
$ mvn -Pe2e clean verify
The workflow is as follows:
- The module’s
pom.xmlfile uses theexec-maven-pluginto run, in the Maven’spre-integration-testphase, the commandcdk synth. This command creates the associated CloudFormation template in the directorycdk.out. - Then the same
exec-maven-pluginruns, in the same Maven’spre-integration-testphase, the scriptdeploy-ecr.shwhich automates the complete container deployment workflow. - This script creates the ECR (Elastic Container Repository) repository if it doesn’t exist, using environment variables for dynamic naming and region configuration.
- Then it authenticates with ECR, retags the local Docker image with the ECR registry URL, and pushes it to the remote repository.
- If the stack already exists, due to a previous execution, then it is updated, otherwise the complete infrastructure is created from scratch.
Here is the script:
#!/bin/bash
registry=$CDK_DEFAULT_ACCOUNT.dkr.ecr.$CDK_DEFAULT_REGION.amazonaws.com
echo ">>> Creating ECR registry $registry"
aws ecr create-repository --repository-name $CONTAINER_IMAGE_GROUP/$CONTAINER_IMAGE_NAME  --region $CDK_DEFAULT_REGION 2>/dev/null || echo "### Repository already exists"
echo ">>> Logging into ECR..."
aws ecr get-login-password --region $CDK_DEFAULT_REGION | docker login --username AWS --password-stdin $registry
echo ">>> Tagging and pushing existing image..."
docker tag $CONTAINER_IMAGE_GROUP/$CONTAINER_IMAGE_NAME:1.0-SNAPSHOT $registry/$CONTAINER_IMAGE_GROUP/$CONTAINER_IMAGE_NAME:latest
docker push $registry/$CONTAINER_IMAGE_GROUP/$CONTAINER_IMAGE_NAME:latest
echo ">>> Checking if stack exists..."
if aws cloudformation describe-stacks --stack-name QuarkusCustomerManagementStack --region $CDK_DEFAULT_REGION >/dev/null 2>&1; then
  echo ">>> Stack exists - updating ECS service ..."
  CLUSTER_NAME=$(aws cloudformation describe-stack-resources --stack-name QuarkusCustomerManagementStack \
    --query 'StackResources[?ResourceType==`AWS::ECS::Cluster`].PhysicalResourceId' \
    --output text --region $CDK_DEFAULT_REGION)
  if [ -n "$CLUSTER_NAME" ]; then
    echo ">>> Found cluster: $CLUSTER_NAME - updating ECS service..."
    aws ecs update-service \
      --cluster $CLUSTER_NAME \
      --service customer-service \
      --force-new-deployment \
      --region $CDK_DEFAULT_REGION
    echo ">>> Waiting for service update to complete..."
    aws ecs wait services-stable \
      --cluster $CLUSTER_NAME \
      --services customer-service \
      --region $CDK_DEFAULT_REGION
    echo ">>> Service update complete!"
    exit 0
  fi
fi
echo ">>> Deploying full infrastructure..."
cdk deploy --all --require-approval never
echo ">>> Deployment finished !"
Beware that the deployment operation is a long-running process which can take more than 15 minutes. Also, once deployed and running, you’ll be invoiced for the cost of the associated infrastructure.
During the script execution, you can check the progression by running scripts
like describe-services.sh, describe-events.sh, describe-stacks.sh, etc.,
or simply using in the AWS Console to look for possible error messages in the
CloudWatch log groups. In order to run scripts you need to:
$ cd aws-cdk-quarkus/customer-service-ecs
$ ./customer-service-ecs-cdk/src/main/resources/scripts/<script-name>
Once the deployed successful and after having exercised your infrastructure,
don’t forget to run the delete-stack.sh script, which will remove everything
you deployed, avoiding you this way to be invoiced by AWS.
Enjoy !